
“My site is very slow. Can you fix it?” We get this message several times a day from new customers who are disappointed with the performance of their websites. That’s why we decided to create this free WordPress speed up optimization guide.
WordPress has revolutionized the Internet as a free tool that boasts high scalability. This has resulted in its overwhelming success – more than 75 million websites use this as their main Content Management System.
Due to the number of plugins and new features that are launched every minute, most websites suffer with speed issues that decreases their conversion rates and increases their bounce rates. This makes rankings on the first page even more difficult.
You have 7 seconds!
The average human’s attention span is only 7 seconds. This means that a goldfish actually has a longer attention span than a human. But goldfish do not buy from you. So, working to make loading time smaller and making pages more attractive should be one of your focuses from now on – optimization is a continuous job.
Website speed is also all about user experience. A good user experience results in great conversion rates – it’s as simple as that! According to Google, more than 50% of visits to a site leave if the loading time exceeds 3 seconds. A good response time will reduce the public’s rejection of the site and this will greatly increase the chances that a user will buy something from the site.
In addition to the human factor, robots like Googlebot can also get bored and therefore hamper your rankings in the search engines. Load time is one of the most important metrics that will set the judgment of the search engines for your site. Particularly taking care of the loading time on mobile devices can significantly increase your rankings in mobile searches, where users often try to access your site through less powerful networks.
Is my website slow?
Before taking any action, you need to know if your website really needs to be optimized. Ideally, the loading time of your pages should be between 1 and 3 seconds. This is the time that your user expects to wait to know more information about you or your company.
To find out if your website loads in a timely manner, you should use a speed test tool. In this article, we will use GTMetrix, which is a free tool and reports all the information we need to know before starting any procedure.
There are other options that are also excellent such as Pingdom Speed Test, WebPageTest, and Sucuri Load Time Tester.
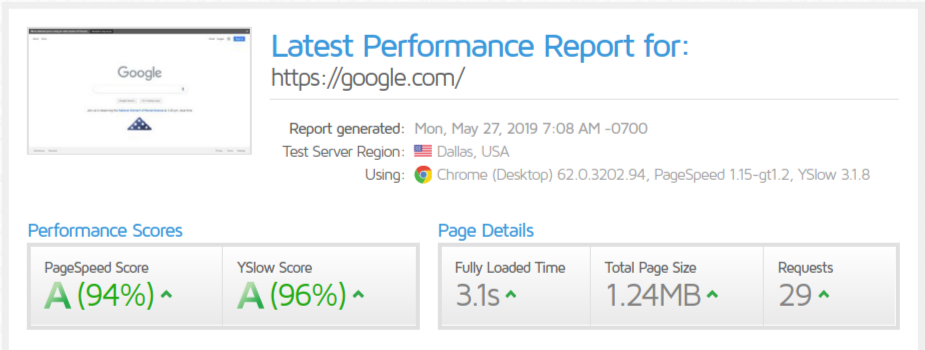
GTMetrix is pretty straightforward. As you can see below, it simply shows Performance Score (Google PageSpeed & Slow) in the left and Page Details (Loading Time, Page Size & Requests) in the right.
Why is my website so slow?
Well, there are thousands of possible causes. We will briefly list the ones we see most often. After that, we will show in detail how to identify the bottlenecks using the tools provided by GTMetrix.
High TTFB
TTFB stands for Time to First Byte and represents the time it takes for the server to deliver the first byte of data from your site to the web browser.
Websites that are not optimized and don’t have any caching can generate a high resource usage on your server. So, if your server is stressed, the page delivery time will be considerably longer.
Although the concept sounds too technical, the solution is quite simple. We will return to this subject later the article, so keep reading.
Page Size
Static files like JavaScripts, CSS, and images that make your site more beautiful can also be performance villains. This type of file directly influences the “Page Size” metric, which will be indicated in MB (or KB). It is the sum of all the static files within your page.
There are several ways to fix this problem and one of them is to work on compressing these files. We’ll point out some tools throughout this article that can help you get closer to a 1 second load time.
External Scripts
This is undoubtedly one of the most common items on the list! Embedded YouTube videos, Facebook “like” buttons, and everything else you get from another site can have a big impact on load time. Unfortunately, your options are very limited, since you have no control over these files or where they are hosted.
One option to fix this problem would be to scan all the files being included in your pages and get rid of those that are not as important or that can be overwritten by built-in functions.
Plugins & Themes
Codes that lack efficient logic and are not updated frequently can be a limiting factor in your site’s performance. If you’re wondering how to tell if a theme or plugin is good, check out the changelog and make sure the plugin/theme is still maintained and has frequent updates. This is important not only for performance, but also for the security of your site.
Speed Up your WordPress
With all the information we’ve covered, you’re now ready to move on to optimizing your site. Before we begin, keep in mind that the modifications that will be applied can break your site, so always perform the procedures in a development environment and always have a backup.
First of all, test your GTMetrix website URL for comparison. We will be using Utimize’s own website, so we’ll run a before vs. after GTMetrix test.
1 . Caching
WordPress, like most CMS’s, works with dynamic pages, meaning that every time a user accesses a page, the server must process the search requests to the database and work on rendering that information according to the scope defined by the code.
If your site has very few hits per day, you may not notice slow speeds, but things can get worse as the number of simultaneous hits increases. If ten people are accessing your site at the same time, this means that the server will need to do ten times the work, and this is not efficient as it consumes resources beyond what is necessary.
To address this, there are caching tools which replace dynamic content with static HTML pages. For this example, we will use WP Rocket which, among the options we have already tested in the market, was the one that reached the highest performance level. There are other options like W3 Total Cache which also had good results and is free.
WP Rocket
WP Rocket is pretty straightforward and to the point. Once the plugin is activated your website is already being cached. It is important to mention that you should review some settings that are activated by default.
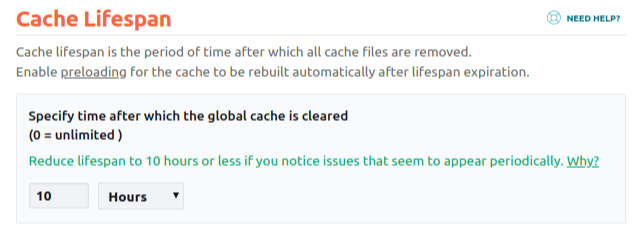
Note 1 – In the “Cache” tab under “Lifespan Cache”, check how long the cached copies of the pages are stored for before they are deleted. If your site is updated frequently, you should lower the Lifespan Cache to the lowest value that matches your needs.
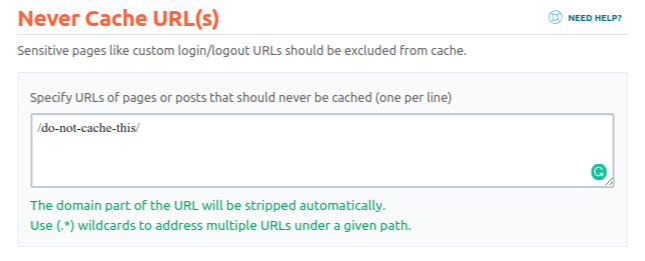
Note 2 – If you are using WooCommerce, do not worry about the cart, checkout, and my account pages cache. WP Rocket already identifies these pages and by default does not cache them. If there is any other page that you do not want to be cached, look for the “Advanced Rules” menu and add the URL(s) to “Never Cache URL(s)”.
WP Fastest Cache
Step 1 – Install WP Fastest Cache.
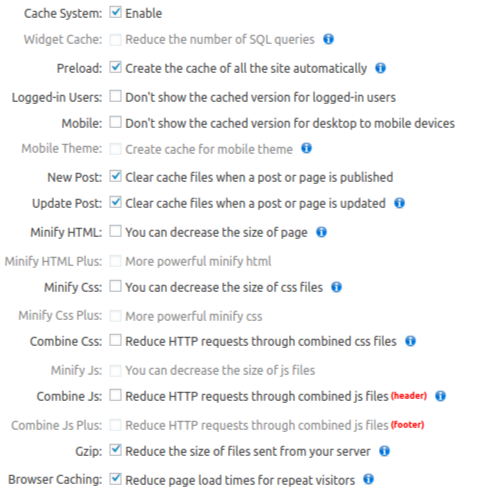
Step 2 – Access the plugin settings menu and select options “Cache System”, “Preload”, “New Post”, “Update Post”, “Gzip”, “Browser Caching”, and “Disable Emojis”.
Step 3 – Click Save and wait for the cache to be populated.
2 . Images
Images are probably the most valuable asset you have when attracting the attention of your prospects. With the evolution of the internet, we’re using more and more images on our sites in order to make them look better and attract our visitors’ attention. Top image optimization tools for WordPress include ShortPixel (freemium) and Imagify (premium).
The goal in optimizing images is to maintain quality while decreasing the file size so it will load in a shorter time, but visually there will not be any difference. In addition to impacting the loading time, optimizing images should considerably reduce bandwidth usage.
ShortPixel
Step 1 – Install the ShortPixel and sign up on their site.
Step 2 – After registering, an API key must be generated. Use it in the API Key field.
Step 3 – In the ShortPixel settings under “Compression Type”, select “Lossless”. Remember to include Thumbnails, which is where most of the images are on a website.
Step 4 – Click the Save button and wait for the procedure to be completed.
Imagify
Step 1 – Install Imagify Image Optimizer and create an account on their website.
Step 2 – An API key will be generated. Enter it in the “Connect to Imagify” field on your website.
Step 3 – Proceed with the plugin settings. Remember to enable the “Auto-optimize Images on upload” and “Backup original images” options.
In our tests, the “Aggressive” compression level reduced the size of images without decreasing the quality. At the “Ultra” level, there was a considerable loss of image quality, so we recommend that you perform this test in the development environment so you do not have these problems in production.
3 . Lazy Load
Lazy Load is a tool used to delay loading images that are offscreen. For example, there is no need to load all the images on a particular page at the same time, so Lazy Load allows these images to only load if the user scrolls down and needs to see them.
This results in a much shorter loading time, and considerably reduces bandwidth usage. There are some options for Lazy Load available in the market, and many of these are free. In our tests, the Lazy Load by WP Rocket and A3 Lazy Load had the best results.
Lazy Load by WP Rocket
Step 1 – Install the Lazy Load plugin by WP Rocket.
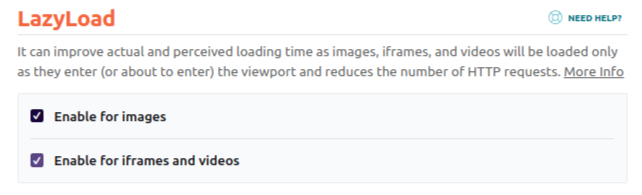
Step 2 – Access the settings and select the “Images” and “iFrame & Videos” options.
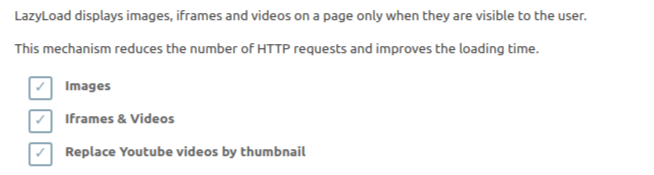
The option “Replace Youtube videos by thumbnail” can greatly reduce the loading time. After all, external files that are used to embed the Youtube video on your site will not be loaded until the user clicks on the thumbnail.
If you are using the WP Rocket plugin, do not install Lazy Load by WP Rocket. Just activate the same options flagged in the steps above in the “Media” tab in the WP Rocket settings.
A3 Lazy Load
Step 1 – Install the Lazy Load A3 plugin. The plugin functions will be automatically activated.
Step 2 – Check if there are any images that are not loading and use the “Exclude by URI’s and Page Types” functions to fix any problems.
4 . Minify/Combine
Files like CSS and JS of your theme, and plugins in their pure form are quite large and loading them every time a new page is rendered can be a problem in both performance and bandwidth usage.
To resolve this problem, minification and combination of static file tools have been developed. In our experience, the most effective tools are WP Rocket (premium) and Autoptimize (free).
WP Rocket (File Optimization tool)
WP Rocket offers minify/combine tools within the main plugin, so follow the steps below if you have a valid subscription to the plugin.
Step 1 – In the plugin settings, go to the “File Optimization” tab.
Step 2 – Select options “Minify HTML”, “Remove query strings from static resources”, “Minify CSS files”, “Combine CSS files”, “Minify JavaScript files”, “Combine JavaScript files”, and “Load JavaScript deferred”.
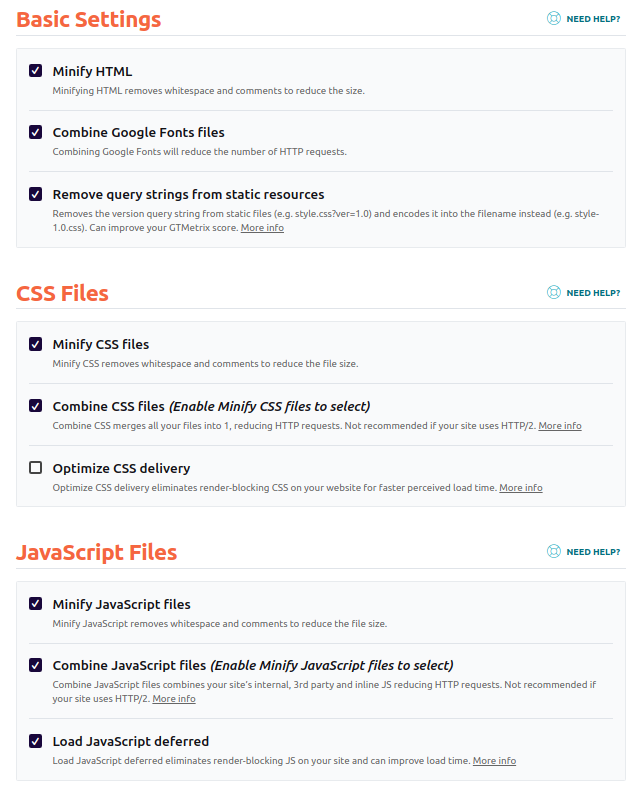
Access the pages on your site and make sure there has not been any layout breaks. If you encounter any problems, try disabling option by option until the problem is resolved.
Autoptimize
Step 1 – Install the Autoptimize plugin.
Step 2 – Select the “Optimize JavaScript Code”, “Optimize CSS Code”, and “Optimize HTML Code” options.
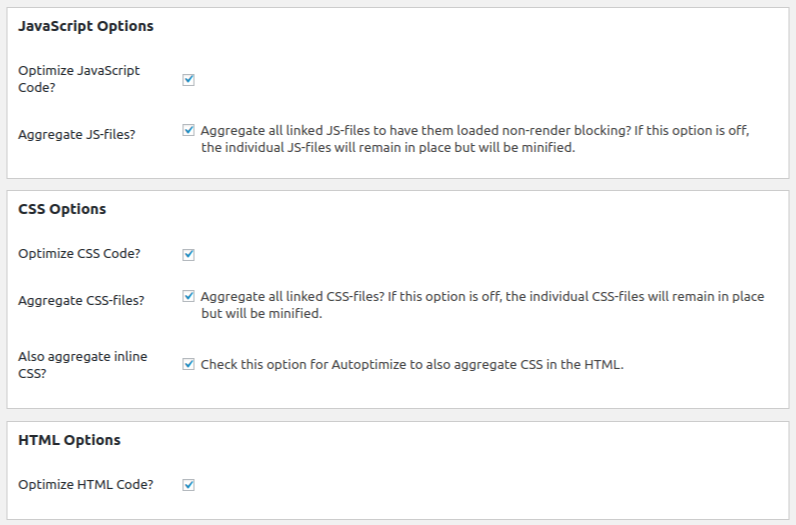
Step 3 – Click “Save Changes and Empty Cache”.
5 . CDN
The loading time of a site is also relative to the location of the users who access it. This occurs for several reasons, including the distance between the server and the user. If a user in Brazil wants to access a site hosted in the United States, the physical factor will delay the delivery of the static files. On the other hand, if a user from the United States accesses the same site, the delivery of the static files will be much faster.
Because we can not control the location of users, technology such as Content Delivery Network (CDN) helps us eliminate server-user boundaries.
The CDN will create cached copies of your images, CSS, JS, and other static files and will store those copies in several points of presence (PoP), which are nothing more than several servers located in all parts of the world. Thus, the user accessing the site from Brazil will not have to download the static files of a site hosted in the United States. The PoP closest to this user will be responsible for handling requests from that location .
There are several CDNs available in the market: MaxCDN and KeyCDN are examples. In our tests, the top performers were Sucuri (starting from $199.99/year) and Cloudflare (free).
6 . External Scripts
We often need to embed a YouTube video, put a Facebook share button on our website, or even add tools like Google Analytics or Hotjar. The problem is that these tools usually come with external codes that need to be loaded on your page. Although most of them are created with performance in mind, many still have a browser cache time that is too low or takes too long to respond in general.
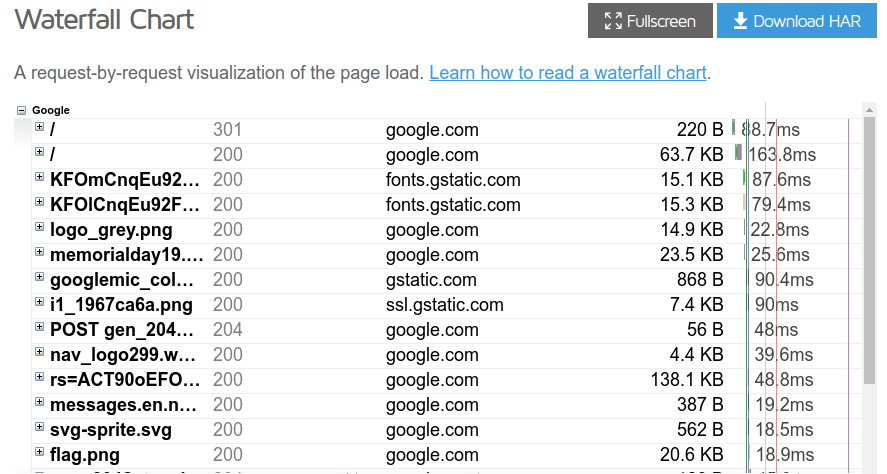
Resolving this problem is not much of a secret – you need to look at what plugins or files are being added to your pages and turn them off if it does not do harm to your page. To do this analysis, you can use the Waterfall tab of GTMetrix, which will inform you of the origin of the file and how long it takes to load.
Some external scripts are very important and so you can’t just throw them away. There are ‘handlers’, which host the contents of these external files internally. WP Rocket offers some add-ons for this. You can see them in the plugin’s settings under “Add-ons”.
7 . Database
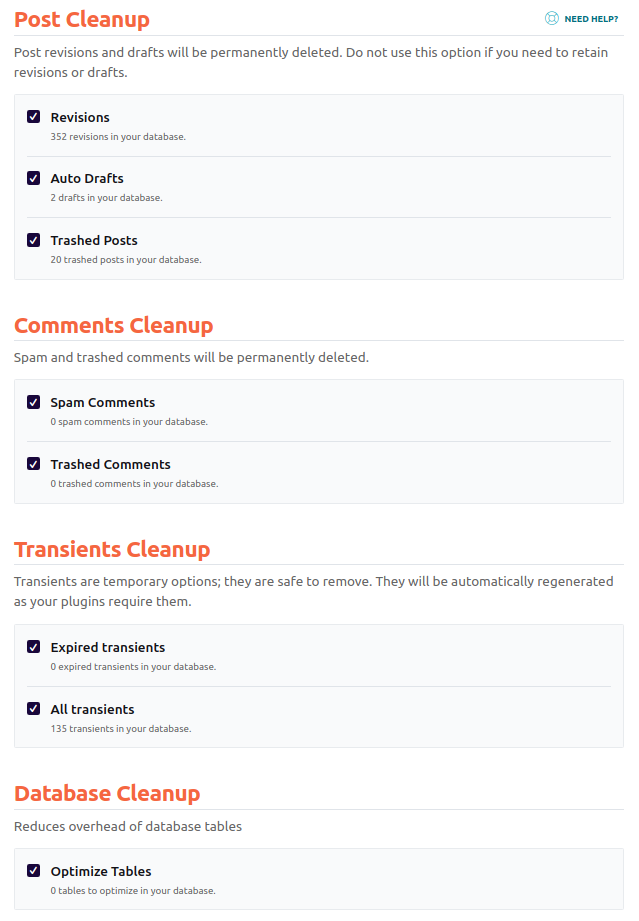
The database can be a problem for those sites with a few months of use. Over time, WordPress starts to accumulate a lot of unnecessary data like trashed posts, unused tags and categories, and transients. Saving this information only makes your site heavier and slower.
Among the best options available in the market is the WP Rocket Database tool and the Optimize Database after Deleting Revisions.
WP Rocket (Database Tool)
WP Rocket has a database optimization and cleaning tool inside the main plugin.
Step 1 – In the WP Rocket settings, go to the “Database” tab.
Step 2 – Select options “Revisions”, “Auto Drafts”, “Trashed Posts”, “Spam Comments”, “Trashed Comments”, “Expired Transients”, “All Transients”, and “Optimize Tables”. Keep in mind that these options will delete data, so only select these if you are sure of what you are doing.
Optimize Database after Deleting Revisions
Step 1 – Install the Optimize Database after Deleting Revisions plugin.
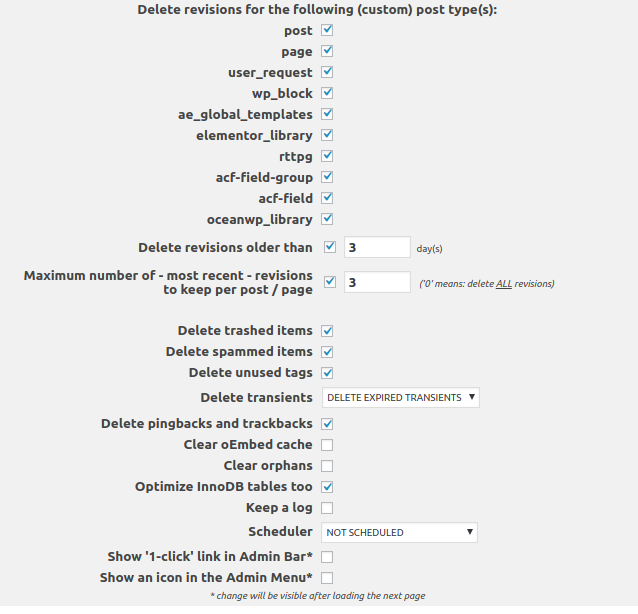
Step 2 – In the plugin settings, select option “Delete revisions older than” and fill in with the value “3”. In the “Maximum number of – most recent – revisions to keep per page/page” option, enter the value “3” and select options “Delete spammed items”, “Delete pingbacks and trackbacks”, “Delete trashed items”, “Optimize InnoDB tables too”, and “DELETE EXPIRED TRANSIENTS”.
Step 3 – Save the settings, click “Go To Optimizer” and then “Start Optimization”.
Results
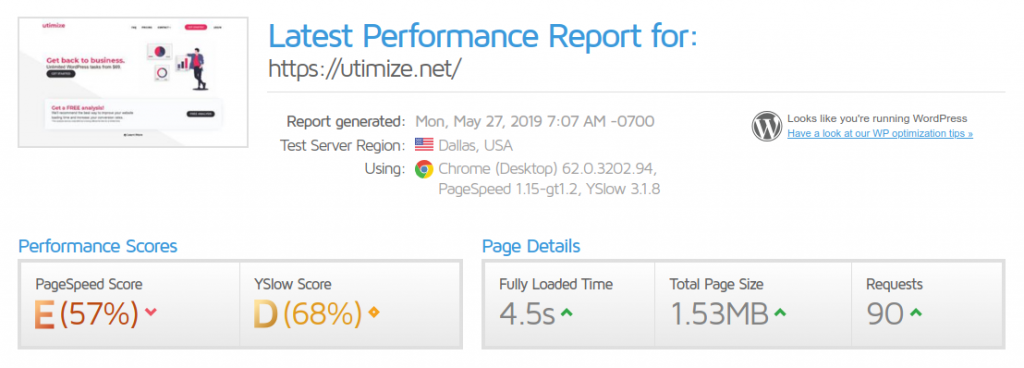
We applied the optimizations mentioned above on our own site, primarily using WP Rocket for caching, static file optimization, and lazy load. Below is the GTMetrix results before vs. after the procedure:
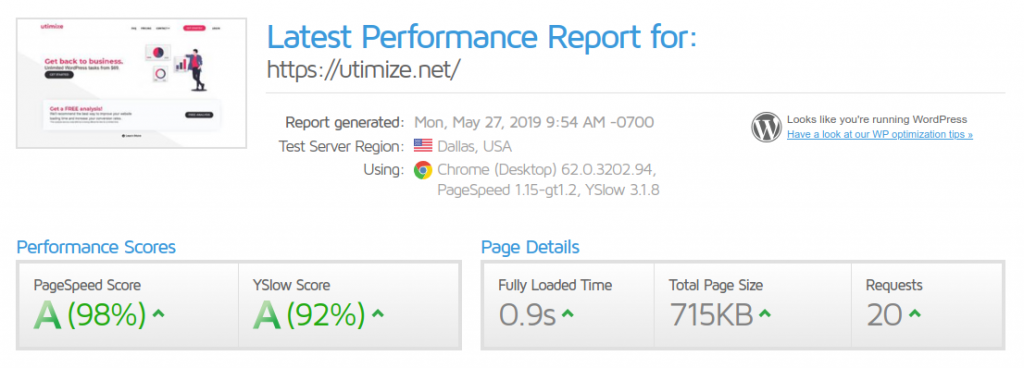
We have been able to reduce the response time of requests and maintain the functional and visual quality of the site. That’s the goal of good optimization! You can go deeper into the process, optimizing code bottlenecks, and even optimizing your infrastructure.
All this work will be rewarded through higher conversion rates, lower bounce rates, and better search engine rankings. The process mentioned above can be used as a great steps to achieve brand recognition on the internet and increase revenue.
That’s it! We’re distributing this guide entirely free so please, make sure to share this with all your friends. Also, feel free to share and comment on your suggestions/questions below. We’re always here to help!